Hi, I'm Jye Ruey. A SET(Software Engineer in Test) from LIFULL. We published an End-to-End testing framework "Bucky" at last time. www.lifull.blog
In this time, an image difference detection tool "Gazo-san", which is for visual testing, is also published.

This article will introduce visual testing and the features of Gazo-san.
What Is Visual Testing
Visual testing is a word that is often heard. But it seems that visual testing doesn't have a formal definition in most testing associations.
We found the definition of visual testing in an introduction article. (https://dzone.com/articles/what-is-visual-testing-a-definitive-answer-and-app) It says: "Visual testing is how you ensure that your app appears to the user as you intended."
In other words, visual testing is a test that checks what is showing.
Why Visual Testing is needed
When developing in the front-end, HTML, CSS and JavaScript make the site change often.
The factors which are possible to change the layout are just too many. The unexpected changes after developing, like garbling or skewing, sometimes will happen even if we don't notice that.
To make sure the page looks correctly for the user, the test checking the page exactly showing in the browser, may be a proper way for testing.
Three keys in Visual Testing
But checking every page by our eyes is a tough test isn’t it? 😇
- It needs to take the capture before and after the change on the website.
- Full size capture of the site may be too long to check.
- It also needs to check the website in mobile size.
- It's hard to realize the delicate difference.
- Tens of hundreds of cases to check will make your eyes tired.
It seems checking every case by human eyes is impossible. A good tool will help you to check it easily.
Summary the difficulty above. A tool with these three features will be helpful.
- Capture
- Difference detection
- Reporting
Capture 📷
Without the capture, we have nothing to check in visual testing.
In regression testing, capture before and after implementation is very important.
To make sure the capture is the same as the user seen, a size designate and mobile view capture is also required.
Difference detection 🔍
The function that recognizes the difference between the two images.
The tool will markup the part needed to check, so we just need to check the markup rather than the whole capture.
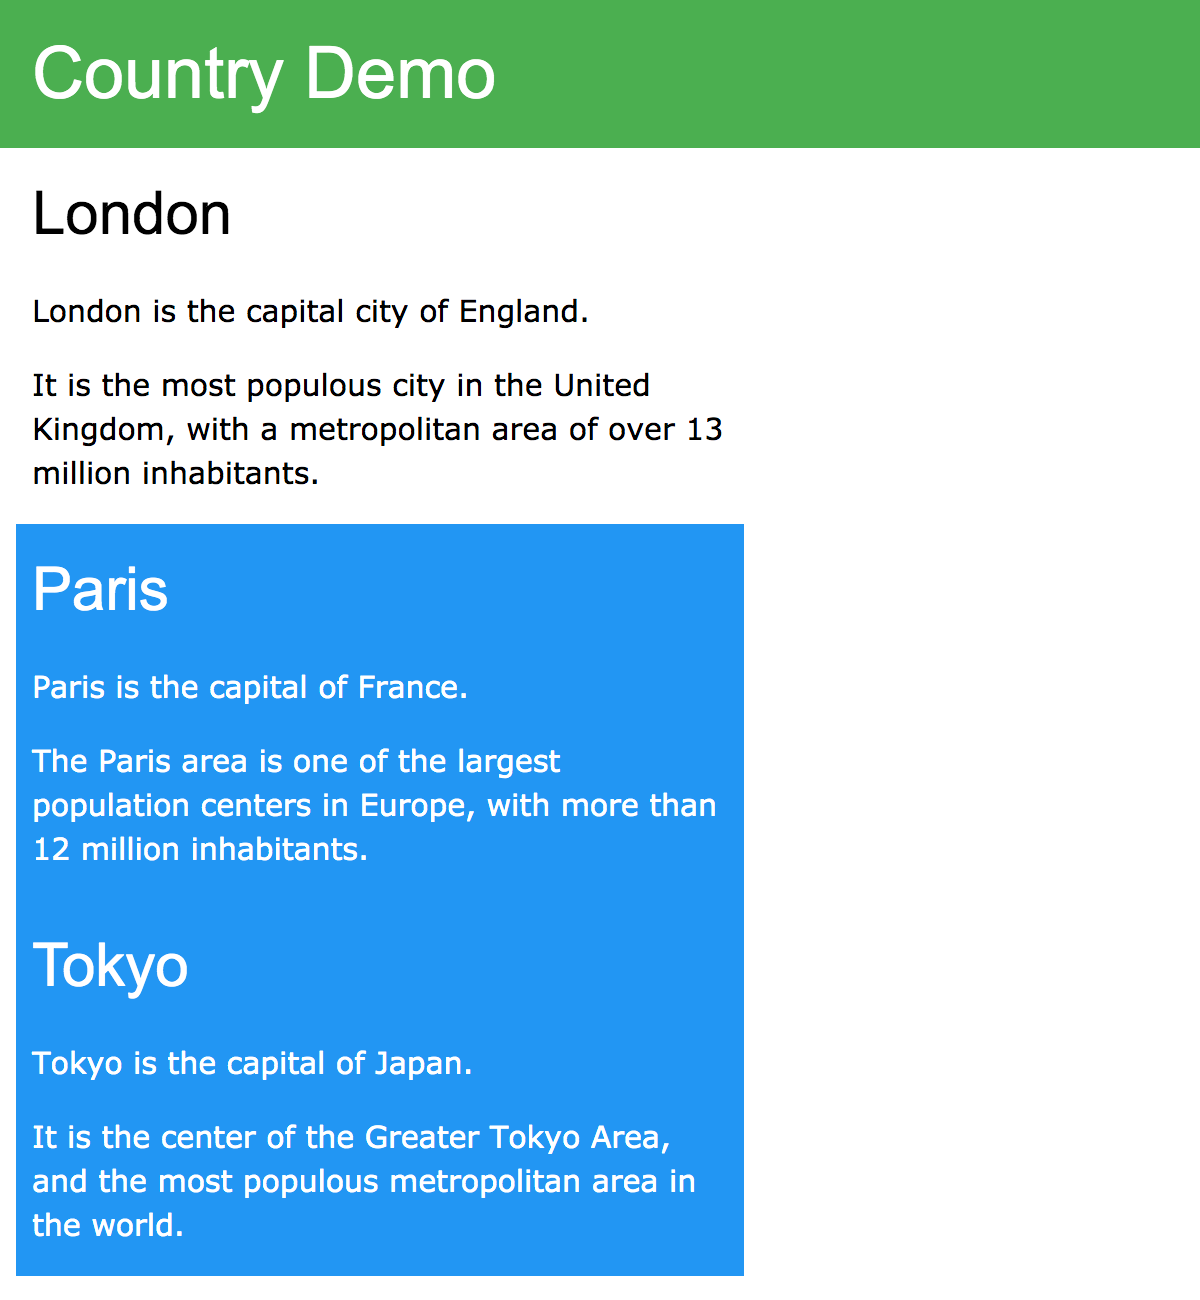
The picture below is an example of Gazo-san difference markup.

The red part is the difference part. The part, which is not red, is the part without any change. We can just check the red part.
Reporting 📑
Checking tens of hundreds of cases is hard work. A good report format will make the check more efficient.
The management and traceability of the test cases is also the key point to a good test tool. If the tool can manage test cases on a dashboard, it will be easier for analysis and checking.
Difference with End-to-End Testing
Visual testing usually checks the capture before and after implementation. So it is also included in regression testing.
Compared with E2E (End-to-End) testing, which is also famous in regression testing, visual testing assures a different objective with E2E.
By controlling the UI, E2E testing assures the function in application to work expectedly on the page.
E2E for funcional, Visual Testing for visual
E2E testing always specifies the UI element by class or id, then manipulates them.
Sometimes, the element may change the place on the page, this will lead the E2E testing not working well and the case may just fail.
In other words, E2E testing can't really recognize the element place changing. To assure the element display in a correct place, a regression test that combines E2E testing and visual testing will be more effective.
Visual Testing has no maintenance cost
E2E testing will need to fix the test script when the element has been changed.
Visual testing only compares the two captures, it doesn't need to maintain any test script.
However, there will be cases such as dealing with application data deficient and redefining the test target. It may still cost some other effort.
Visual Testing in LIFULL
SET team in LIFULL uses visual testing for two reasons.
- To assure the visual change.
- To reach a broader coverage by combining visual testing with E2E testing.
E2E costs the effort of implementing a test script, but visual testing can start with only the captures that want to compare.
The strategy to make broader coverage is moving the implementation and checking effort into visual testing.
Actually, we don't use the packaging visual testing tools, we deal with the three keys in visual testing respectively as follows.
Capture
We take the capture of the target page in full size by headless chrome.
Difference detect
We use "Gazo-san", which is an image difference tool we publish at this time. It will be introduced later in this article.
Report
We prepare a HTML template for the difference report in each test case.

The upper form will be created before the new release. We can check the difference in red parts from each case.
If the UI changes expectedly in this release it means the test is passed. Otherwise we will report the bug to developers.
SET team has created the visual testing for the integration environment in system testing level, to make sure there are no side effects between each feature.
Maybe the visual testing system still gets somewhere to improve, it just works pretty well. We can check 150 test cases in 10 minutes with this system.
Features of Gazo-san
Before introducing Gazo-san, let's talk about the type of image difference detection.
There are two types of image difference detection. ・Perfect match: Compare with every pixel. Also known as Pixel perfect testing. ・Similar match: Calculate the similarity by the algorithm. (There are many kinds of algorithm)
Perfect matches usually show the difference by coloring the parts on the picture. Although, similar matches only show the similar rate in percentage.
| Perfect match | Similar match | |
|---|---|---|
| Pros | Detect detail difference. | 1. Works fine on pictures with different sizes. 2. Easy to recognize even though there are many differences. |
| Cons | 1. Not working well on pictures with different sizes. 2. Hard to recognize the differences when too many differences are showing. |
Can't show the delicate difference. |
The key point in Gazo-san
Although Gazo-san is a kind of perfect match. It has a special structure dealing with recognizing many differences.
The structure is splitting each capture in few parts and showing the difference only on the matched parts.
We’ll show the key point by demo pictures.
Detect on parts
1. Input two pictures for compare
| Before Implementation | After Implementation |
|---|---|
 |
 |
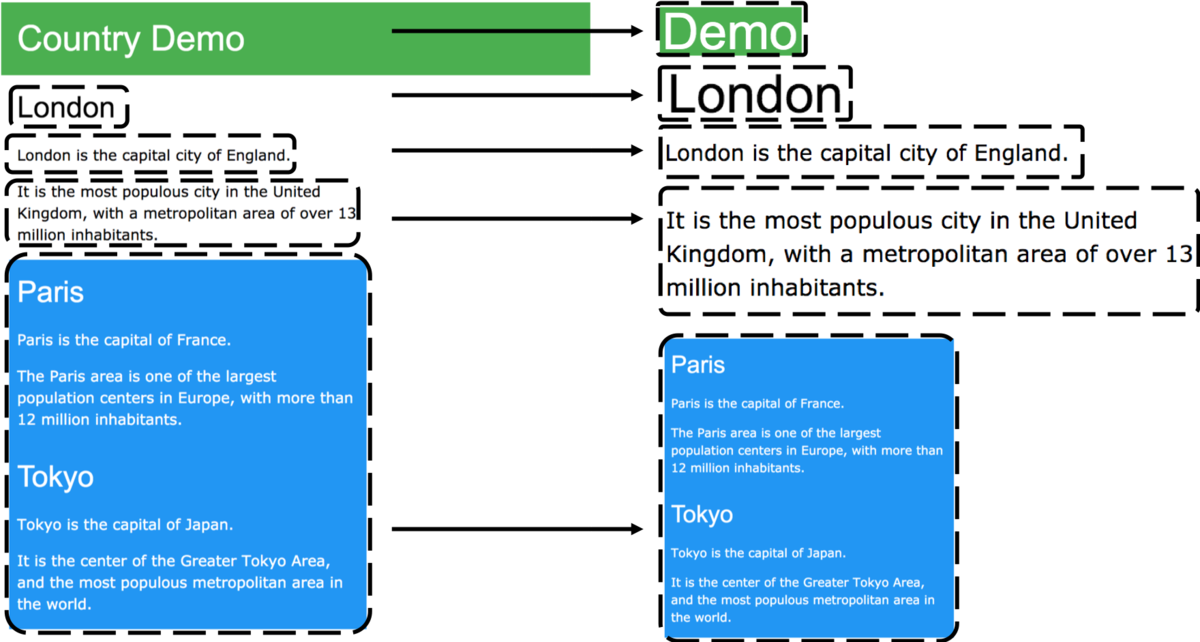
2. Splitting the capture into parts
| Before Implementation | After Implementation |
|---|---|
 |
 |
3. Match by parts
| Parts matched with no difference |
|---|
 |
| Parts matched with difference exist |
|---|
 |
| Parts unmatched |
|---|
 |
4. Create output
In Output_diff, matched parts are surrounded with a red line, the difference will be colored in red.
| Output_diff |
|---|
|
In Output_delete, showing the disappearing parts by surrounding the green line on the after implementation capture.
| Output_delete |
|---|
 |
In Output_add, showing the increased parts by surrounding with green line on the before implementation capture.
| Output_add |
|---|
 |
With this structure, it becomes easier to recognize the difference even though two captures have different sizes.
At Last
SET team executes the visual testing before release to assure the visual view which is expected to show to the user.
We had detected the degradation by visual testing many times. We feel relieved that we execute visual testing before the release.
Using Gazo-san can make visual testing easier. Please give it a try.
Also, there are many tools for visual testing. You can just choose the suitable tool for your team.
At last, there are still some parts that can be improved, we are looking forward to getting your issue or Pull Request. Enjoy the happy visual testing time!