こんにちはAndroid開発グループ橋本です。
今回はAndroidStudioで使うlintについて調査する機会があったので内容を記事にします。(lint自体の解説は省略します。)
まずは実行をしてみる。
Androidのlintの実行について調べてみると、Android/sdk/tools/の下にあるlintが使用できるようです。
参考:http://developer.android.com/intl/ja/tools/help/lint.html
この方法だといちからlintのオプション設定を行わなければいけないため、とても手軽に使えるとは言い難いものです。ではどうしたらいいのか?そもそも開発はAndroid Studioを使う事を前提としていたのでそちらで実行したいところです。
Android Studioから実行
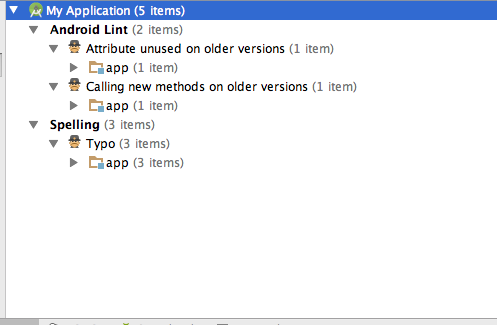
AndroidStudioから実行する場合、実はとても簡単で、メニューからAnalyze→Inspection Scopeで実行できました。


gradleをコマンドラインから実行
Android Studioで作成したprojectフォルダの下にあるgradlewを使用して、以下のコマンドでlintを実行できます。
./gradlew (モジュール名):lint
こちらの方法で実行した場合デフォルトではhtmlとxmlで出力され、実行後に成功していれば出力パスが表示されます。
lintの設定をする。
設定と実行方法はAndroid StudioのGUIに任せるか、手動で行うかのパターンがありますが。GUI上からの設定方法は他文献でいくつかあるようなので、ここでは手動設定の方法を記述します。
build.gradleの設定
作成したprojectファイルにあるbuild.gradleにlintOptionsを追記し必要な項目のオプションを必要に応じて追加する形です。
以下公式から抜粋。
android {
    lintOptions {
        // set to true to turn off analysis progress reporting by lint
        quiet true
        // if true, stop the gradle build if errors are found
        abortOnError false
        // if true, only report errors
        ignoreWarnings true
        // if true, emit full/absolute paths to files with errors (true by default)
        //absolutePaths true
        // if true, check all issues, including those that are off by default
        checkAllWarnings true
        // if true, treat all warnings as errors
        warningsAsErrors true
        // turn off checking the given issue id's
        disable 'TypographyFractions','TypographyQuotes'
        // turn on the given issue id's
        enable 'RtlHardcoded','RtlCompat', 'RtlEnabled'
        // check *only* the given issue id's
        check 'NewApi', 'InlinedApi'
        // if true, don't include source code lines in the error output
        noLines true
        // if true, show all locations for an error, do not truncate lists, etc.
        showAll true
        // Fallback lint configuration (default severities, etc.)
        lintConfig file("default-lint.xml")
        // if true, generate a text report of issues (false by default)
        textReport true
        // location to write the output; can be a file or 'stdout'
        textOutput 'stdout'
        // if true, generate an XML report for use by for example Jenkins
        xmlReport false
        // file to write report to (if not specified, defaults to lint-results.xml)
        xmlOutput file("lint-report.xml")
        // if true, generate an HTML report (with issue explanations, sourcecode, etc)
        htmlReport true
        // optional path to report (default will be lint-results.html in the builddir)
        htmlOutput file("lint-report.html")
        // set to true to have all release builds run lint on issues with severity=fatal
        // and abort the build (controlled by abortOnError above) if fatal issues are found
        checkReleaseBuilds true
        // Set the severity of the given issues to fatal (which means they will be
        // checked during release builds (even if the lint target is not included)
        fatal 'NewApi', 'InlineApi'
        // Set the severity of the given issues to error
        error 'Wakelock', 'TextViewEdits'
        // Set the severity of the given issues to warning
        warning 'ResourceAsColor'
        // Set the severity of the given issues to ignore (same as disabling the check)
        ignore 'TypographyQuotes'
    }
}
一部よく使うであろうオプションについて解説します。
abortOnError
falseを設定することで、build中にlintのエラーが出てもbuild自体に影響を及ぼさない(途中で停止しない)設定に出来ます。コンパイルが通るはずのソースコードをbuild中に止められてしまう可能性があるのでfalseにする事が殆どになると思います。
disable
issue IDを設定することで、設定したissue IDを無視できます。実行するモジュールによってはlintが過度の検出をしてしまう為、明示的に設定しlintの検知から除外します。
lintConfig
lintの設定ファイルを指定できます。パス設定はgradlewのあるフォルダと同じところからみた相対パスになります。
lintの設定ファイルの記述
基本的には.gradleで設定できる内容と同じ内容が設定できますが、lintConfigで設定したフィアルでは詳細な設定も記述できます。
参考:http://tools.android.com/tips/lint/suppressing-lint-warnings
記述方法:ファイルの個別除外とフォルダ以下全て除外の例です。
<?xml version="1.0" encoding="UTF-8"?>
<lint>
    <issue id="all"> ①
        <ignore path="src/test/androidtest.java" /> ②
        <ignore path="src/test/**/*" /> ③
    </issue>
</lint>
- issue idを設定します。"all"を設定することで全issue idを対象に出来ます。
- ignoreで除外とし、optionのpathで対象ファイルの条件を記述します。(絶対パスの記述例)
- 2.の相対パスの記述例
調査してみて
今回lintの調査をしてみて、まだまだ調べ切れていない感じがします。 実際に調べ設定してみて設定方法もGUIからがいいのか手動設定がいいのかの判断まではついていませんが、lintの設定だけ考えると個人的には手動がわかりやすかった印象です。 ただ、実際に運用するにあたっては、lintに検知と対応する事を考えるとAndroid StudioのGUI上から設定し修正・運用する方が良さそうでした。
おまけ
Android/sdk/toolsのlintコマンドで、オプションに--listをつけ実行する事で検知できるissue idが全て見れます。予想はしていましたが種類が多いのでlint実行時に検知されたissue idの内容を調べ随時対応していくのが効率的だと思いました。